First remove all cards except the video and disk controller cards. You can reinstall any cards later, after you get SDR running (not with the power on!). If you add your old cards later and SDR stops working, then you have an interrupt or port address conflict. The default interrupt is 5 and default port address for the card is 544 (220 hex). Before installing the board make sure the port switches are set to the following default setting: Switches 1 and 5 should be open (rocker switch down by the OPEN label), all other switches, 2,3, 4 and 6, should be closed.
Install the board into one of the 16 bit slots and startup your system. Check you autoexec.bat and config.sys files for any unneeded drivers and TSRs. Your system must be able to respond to a 1 millisecond interrupt so it is very important that the system not have anything that can interfere with the interrupt. Do not run any programs like RIGHTIME or other time keeping programs, SDR will keep the time for the system. If you change any files you will need to reboot your system.
You should also check your motherboard's BIOS. Some of the newer boards have interrupt monitoring for the PC Green Power saving stuff. If your motherboard supports this, you will need to disable the monitoring of the interrupt used by SDR and the A/D card. Check your motherboard manual on how to do this.
The first time you start SDR you will be asked for the A/D board Rev number as well as other information about the A/D board settings. The A/D board Rev number is marked on the top side of the board.
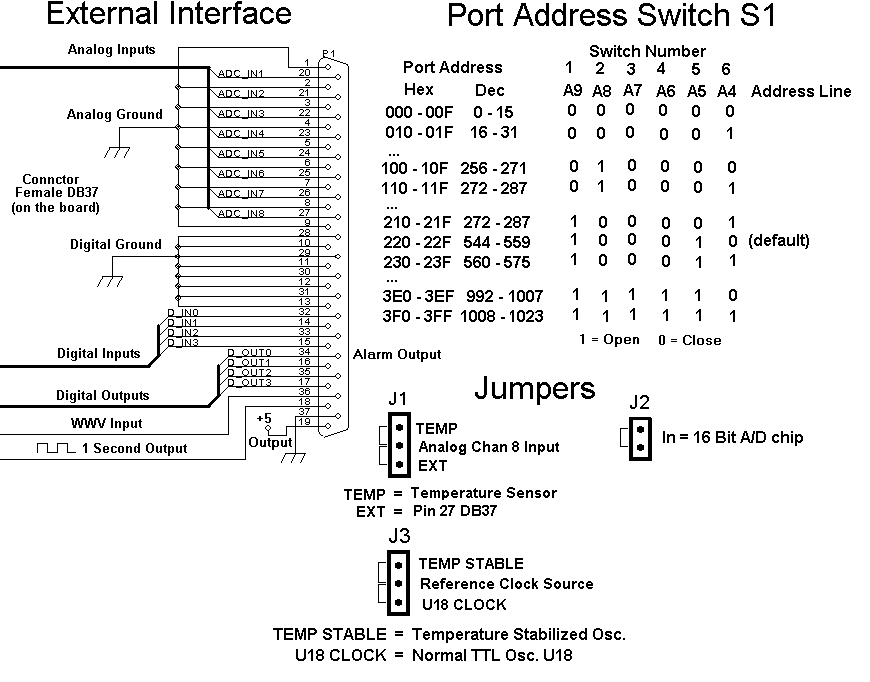
   Pin  Name                  Signal Pin #   Ground Pin #
Analog Channel  1                  20            1
Analog Channel  2                  21            2
Analog Channel  3                  22            3
Analog Channel  4                  23            4
Analog Channel  5                  24            5
Analog Channel  6                  25            6
Analog Channel  7                  26            7
Analog Channel  8                  27            8

WWV Audio Input                    36            37
1 Second Output Test Point         18            13
WWVB and GPS 1PPS Input            32            13

+5 Volts Output                    19            !!!!! BE CAREFUL NOT TO SHORT
                                                   THIS PIN TO GROUND !!!!!
Notes:For a complete pin out of the DB37 connector and jumper settings see the file IOJUMP.GIF.
J1: This jumper is used to control the input to analog channel 8. When the jumper "TEMP" is selected, channel 8 is connected to the temperature sensor used to control the temperature of the crystal oscillator (if you have this option). When the jumper is connected to "EXT" the input goes to pin 27 of the I/O connector.
J2: When used with SDR; When the jumper is in, it tells SDR that the board has a 16 bit A/D chip. When the jumper is out, it tells SDR that the board has a 12 bit A/D chip.
J3: This jumper selects the timing reference source. When the jumper "TEMP STABLE" is selected, the 4.0 Mhz clock comes from the temperature stabilized oscillator (if you have this option). When the jumper "U18 CLOCK" is selected, the 4.0 Mhz clock comes from the TTL oscillator U18.
JP1: Interrupt Request Line (IRQ). Select only one of the IRQ following pins: 2, 3, 4, 5 and 7
JP3: Extended Interrupt Request Lines not used by SDR.
Rev
3 Board:JP1: Interrupt Request Line (IRQ). Select only one of the IRQ following pins: 2, 3, 4, 5 and 7
JP2: Not used
JP3: Extended Interrupt Request Lines not used by SDR.
JP4: Input voltage range. With JP4 off the input range is +-5 volts maximum input. With JP4 in the input range is +-10 volts maximum.
If you need to change the default address of 544 (220 hex) you can use the following table:
    Port Address                  Switch Number
                           1    2    3    4    5    6
Hex            Dec         A9   A8   A7   A6   A5   A4   Address line
000 - 00F     0 - 15       0    0    0    0    0    0
010 - 01F    16 - 31       0    0    0    0    0    1
...
...
100 - 10F   256 - 271      0    1    0    0    0    0
110 - 11F   272 - 287      0    1    0    0    0    1
...
...
210 - 21F   528 - 543      1    0    0    0    0    1
220 - 22F   544 - 559      1    0    0    0    1    0   (default)
230 - 23F   560 - 575      1    0    0    0    1    1
...
...
3E0 - 3EF   992 - 1007     1    1    1    1    1    0
3F0 - 3FF  1008 - 1023     1    1    1    1    1    1